

Florida winter is here, and while it may be chilly by Floridians’ standards, it’s highly unlikely you’ll be seeing snow anytime soon. Sometimes you need a little extra help getting into the winter spirit. These wintery crafts should do the trick for you and your child.
Pinecone Winter Owl
If there’s one thing Florida does have, it’s birds. The state is actually a bird sanctuary! However, some birds only live in colder climates. The snowy owl, for example, calls the Arctic home. This cute craft project can bring this wise bird to Florida for the winter. Any child old enough to handle Elmer’s glue can help put one of these owls together.
Supplies Needed
Pinecones
White felt, beige felt, orange felt
Cotton balls
Googly eyes
Elmer’s glue or hot glue gun glue
Scissors
Instructions
If the pinecones are collected outside, dry them in the oven at 200 degrees for an hour or two. After the first hour, check every 30 minutes or so. If they’re craft store pinecones, they’ll be good to go.
Tear up the cotton balls, and stuff the cotton into the pinecone. No need for glue in this step.
Cut the wings and eye area out of white felt.
Cut the head out of beige felt, leaving space for the eye area.
Cut out a small triangle for the beak from the orange felt.
Glue the layers together, then glue on the googly eyes.
Glue the wings to some of the cotton you used to create the owl shape in the pinecone.
View the full tutorial here.
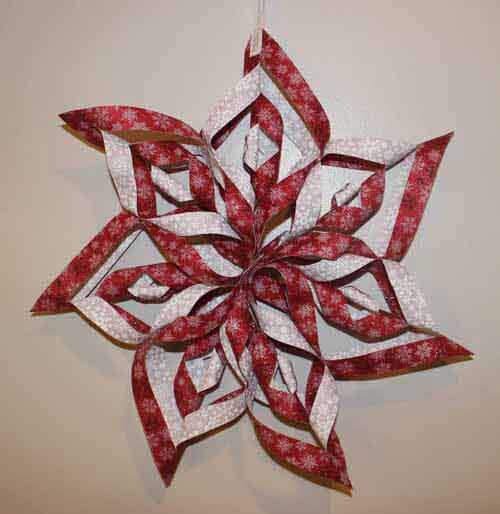
Paper 3D Snowflake
Snow doesn’t fall from the sky in Florida, but that doesn’t mean you can’t make your own! This project is easy, but it has a lot of steps. We would recommend this project for a child who already enjoys crafting and can safely use scissors. Take an afternoon over winter break with your child to make these adorable paper snowflakes. Who says it can’t snow in Florida?
Supplies Needed
Scrapbook paper or regular printer paper
Scissors
Glue or staples
Instructions
Cut seven square pieces of paper. 6” squares will make a snowflake that’s about 15” wide.
Fold each square of paper in half diagonally to make triangles.
Fold each triangle in half to make smaller triangles.
Hold the paper in place by the end with two folds, and cut 3 evenly spaced lines from that end, stopping about ¼ inch from the single folded edge.
Unfold the paper, then twist the innermost points near the center. Glue the point of one over the point of the other to make a cylinder.
Flip the paper, and twist the next points toward the center, gluing them together. Repeat this process for each layer.
Glue the widest parts of each piece together, the area where you glued them together for the first steps.
Repeat the above step with each glued row.
Then, glue the centers together. That’s what will make your final snowflake shape.
If you’ll be using this snowflake as an ornament, you can simply punch a hole in one of the outside points.
View the full tutorial here.

No-Sew Sock Penguin
Penguins can be found in more places than the snowy owl, but Florida is not one of those places, except maybe at a zoo or theme park. Floridian children can’t help but be fascinated by these adorable waddling birds. This project is a little more involved than the other two, so we would recommend doing this one with an older child.
Supplies Needed
Black sock
Colorful sock, preferably with a pattern for the hat
Rice
Rubber bands
White and orange felt
Ribbon
Glue gun
Felt glue
Markers or paint
Scissors
Instructions
Fill the black sock with rice, creating the rough shape of the penguin body as you pour.
Wrap a rubber band or two at the top.
Wrap a rubber band just above the middle to separate the body and head. Shape it as you go, and consider using a second rubber band for reinforcement.
Cut the excess sock, sealing the top with glue from the glue gun.
Cut an oval shape out of white felt. Measure it against the body, and consider drawing the shape before cutting.
Glue the oval shape onto the penguin using felt glue or the glue gun.
Cut a beak out of orange felt, and glue it to the head.
Draw on eyes with a marker, or paint them on for a more 3D look.
Glue on ribbon to make a scarf, overlapping it to give a tied off look.
Cut the colorful sock in the middle.
Roll up the sock to get the hat shape.
Place the hat on top of the penguin.
View the full tutorial here.
Winters in Florida don’t mean snow, penguins or snowy owls, but these crafts can bring the season to the state. At North Tampa Christian Academy, a Tampa private school, students thrive creatively, academically and spiritually in a project-based learning environment. Faculty and families work together to inspire leadership through Christian innovation. Contact us today to learn more.